| |
Make your own icons tutorial
4. Now you will need the DC LINKER V2.11B
(dcload21.zip)
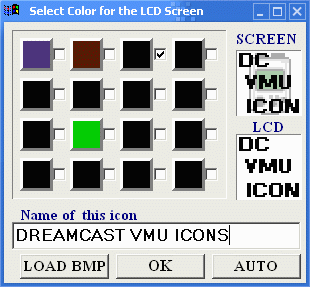
When you have that open, right-click on the file area and click "New DCM File"
then type in the name you want the file to be and click save. Once again
right-click on the file area but this time click "Import Caption BMP" and then
open the BMP file we made in the last step. Now click on the colors you want to
show on the LCD Screen of your VMU and choose a name for your icon. When your finished click OK.

5.
Now if you are have a VMU that you can connect to your computer, you can
connected and load the DCM file to your VMU with the DC LINKER. But if you
don't have one then you will need to upload your icon to the internet and
then get on the net with you Dreamcast and download it to your VMU! The only
place you can upload DCM files to the net and be able to download them to
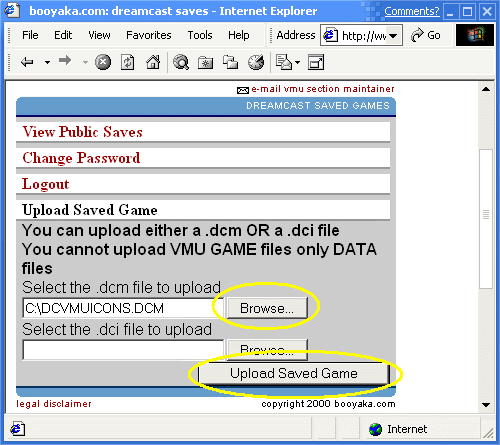
your VMU with the Dreamcast Web Browser is booyaka.com. To do this you will
need to go to http://www.booyaka.com/games/vmu/saves.fcgi.
When you get there you will need to either login or sign up for a login name!
When you login, you will need to click the Browse button next to the "Select
the .dcm file to upload" box. Find your DCM file you made in the last step
and open it. After the you need to click "Upload Saved Game".

6.
When your icon has been uploaded it will say "Your saved game was
successfully uploaded.". When it says this you need to get on the internet
with your Dreamcast and go to
http://www.booyaka.com/games/vmu/saves.fcgi.
Login and and when you are loged in go to the bottom of the page and you
will see your icon, click on it and save it to your VMU. Now you have your own VMU
icon. If you don't want to make an icon just go to www.planetdreamcast.com/dcvmuicons and
download icons that are on the site. Have fun making icons :)
...tutorial made by: Robert Dale Smith (robert@robertdalesmith.com)
< Back
© 2000, DREAMCAST VMU ICONS. All Rights Reserved.
legal disclaimer
|
|
|
|


